Showing posts with label Blogger Hacks. Show all posts

Friday, June 26, 2009

Some Of Cool Styles To Have Good Hyperlinks

0 comments
Hi All My Dears Readers ;-)

I got this cool changes to add more features to your content that should have some of hyperlinks so you can change this default hyperlinks to have good hyperlinks, For example you can change font color on mouse over or change font size or font family on mouse over or another smart changes look like adding background color on mouse over, Just follow this simple steps to do it.
 Firstly: You can remove the default underline from any hyperlink just add this:

Any default link code will look like this:
<a href="URL">TEXT LINK<a>
Just add text-decoration and set it to none or look in this:
<a style="text-decoration:none;" href="URL">TEXT LINK<a>

Secondly: Also you can change font color on mouse over like this in head area:
<style type="text/css">
a.one:link {color: #ff0000}
a.one:visited {color: #0000ff}
a.one:hover {color: #ffcc00}
</style>
,You can change colors code  #ff0000 .
Now to make your style working just add your class a.one in this code look like this:

<a class="one" href="URL">TEXT LINK</a>

Thirdly: If you want to change font family or font size on mouse over just add this styles in head area:
A)To change font family when you mouse over the link add this:
<style type="text/css">
a.four:link {color: #ff0000}
a.four:visited {color: #0000ff}
a.four:hover {font-family: monospace}
</style>
,You can change font monospace to Verdana or Arial or any other font families.
Now to make your style working just add your class a.four in this code look like this:

<a class="four" href="URL">TEXT LINK</a>

B)To change font size when you mouse over the link add this in head area:
<style type="text/css">
a.two:link {color: #ff0000}
a.two:visited {color: #0000ff}
a.two:hover {font-size: 150%}
</style>
,If you want to change size just change 150%.
Now to make your style working just add your class a.two in this code look like this:

<a class="two" href="URL">TEXT LINK</a>

Fourthly: To add background color or background image when you mouse over the link just add this code in head area:
<style type="text/css">
a.three:link {color: #ff0000}
a.three:visited {color: #0000ff}
a.three:hover {background: #66ff66;background-image: Image Url;}
</style>
,You can change color by editing color code #66ff66 and also you can add Image Url .

Now to make your style working just add your class a.three in this code look like this:

<a class="three" href="URL">TEXT LINK</a>

Have Fun And Well Done,
Read full story

Friday, June 5, 2009

How To Add Your Author Photo Alongside Post Title

0 comments
All of us always look for the better to make a greatest post in terms of improving the form and content, So you can add some cool features to your post look like adding your blog photo beside every post title.

solutions
Follow this simple steps:

Now search for this tag in your template:
<b:if cond='data:post.title'>
And now copy this code adove the previous code recommended size for your photo is 32×32 or 25×25px:

<img align='left' border='0' height='32' hspace='5' src='YOUR IMG URL HERE' vspace='3' width='32'/></img>

Now just add your image url and preview, Have fun And Certainly Well Done, Mission Accomplished;
Read full story

Styling The First Character Of Your Post

0 comments

Hi there my readers i get this addition to make our posts more interesting, It's very simple steps to do it just follow this steps and surly you will add it:


Step 1):

As usual copy this code in the head area of your template html:
<style type="text/css">
.bigfont {
float:left;
margin-top:2px;
margin-right:10px;
max-height:auto;
font-family:Georgia, "Times New Roman", Times, serif;
font-size:500%;
color:#ff9900;
width:0.7em;
line-height:80%;
}
</style>
Also you can add your changes look like increase font-size or change font-family and color .

Step 2):
When posting your article in the beginning just add the first character in this code
<span class="bigfont">Your First Character Here</span>
Have fun And Certainly Well Done, Mission Accomplished;
Read full story

Wednesday, May 20, 2009

3 Tricks To Placement Your Adsense Code In The Content Of Your Posts ?!!

5 comments


•
All of us believe in Google Adsense ads is knowing where to place the ads. In this guide, we shall discuss the modification you can make to your Blog template to have your Google AdSense ads appear between your post title and post body, or between your post body and post footer. Also, we shall have the AdSense ads appear on every individual post.


• Many people believe that having AdSense ads just before or after the Blog posts will best optimize their performance. For the purposes of this article and to give you an idea how it would look, we have inserted the AdSense code into our template to have the ads appear immediately below the article and before the post footer. If you think you would like to do the same for your Blog, the following are the steps you should take.


• Choosing a best placement for your AdSense ads will attract more attention
and will certainly impact on the revenue of Ads so i got this 3 ways to improve your ads locations.

•
I will explain the 3 tricks and after finish i will show you the differences between them.

●
The 1rst Trick (adding the ads in the posting box):

•
Follow this steps given below:
-----------------------------------------
1- Log in into blogger with you ID
2- Go to "Settings" >>>"Formatting"
3- Change "Convert line breaks" from (Yes) to (No) and saving your settings.
-----------------------------------------

• Now you need to go to posting your topic that will include adsense code how can add the code just copy and paste this code any where you want in the post content :

Code:


• After finish your posting included ads code sure your ad will appear in the place you have chosen.

#Tip-"You can add this code every where you want in the blogger post just for example you can add ads in the beginning of post content or put ads in the middle or put it in the end of post you just chose the best places of your content to achieve more click on the ads".


● The 2ond Trick (ordinary way by blogger feature):

- Use This Google Feature:
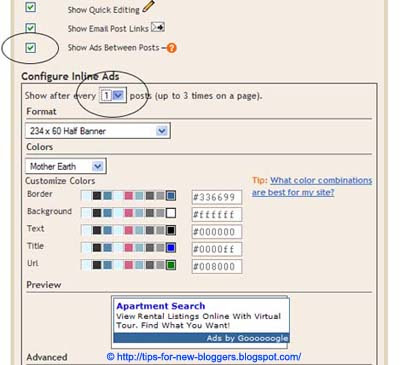
• Go to Template -> Page Elements and you see in your layout the heading “Blog Posts”. Click the “Edit” link at the bottom right corner. You will see this screen.


•
Click on check for the “Show Ads Between Posts” You can change placements to show ads after every post or after several posts. In accordance with AdSense Terms, a maximum of 3 Ads will be shown, Customize the ad format and size, color scheme. Save the changes and refresh your Blog to see the Ads.


● The 3rd Trick (ads code editions):

- Some Changes For Ad Code and locations:
•
All we have to do now is to add some changes for your adsense code,all we have to change is converting some of the characters in beginning and ending of the code look like change this signs (>,<,") with other characters follow how you can do this :

Change the html signs to creat your Edition code in this New Signs in this Txt :


for example look in this screen:


Your
Edition code must copied in this code i will named it Y:


• After editing your adsense code open your dashboard, Go to Template -> Edit HTML -> Click the "Download Template" link to backup the template to keep your template additions then click check for “Expand Widget Templates”.

Now search for post.body(data:post.body) through your browser's search function (Ctrl+F for Firefox or IE).

Find this code:


If you want the ads appear above post content, just add your Edition code above the previous code ,Also if you like to add Adsense ads below the content of post just do the opposite.


#Tip-
"Choose the smallest AdSense formats look like 125x125 or 468x15 to keep the regularity of your post content, You can change your ads Float from left to right or center".

- Set Ads Margins & Padding
(Styling Code Y ) :
• If the AdSense ads appear too close to the edge, To give you an idea how wide the margin should be you can set margin to 30px so the new Y code will be after adding margin-left:30px :


Or you want to align the AdSense ad to your text, you can set a margin or padding around the entire AdSense code the new Y code will be after adding
margin-left:5px 10px 15px 20px :


5px
: is for the top margin
10px : is for the right margin
15px : is for the bottom margin
20px : is for the left margin

Preview the template and if you are satisfied, save the template and refresh your Blog to see the new placements of your AdSense ads.

• The Differences between this tricks

-The First Trick :
Ads appear in one post and not appear in other messages because we add the code in the posting box html not in the html of your template.


-The Second Trick
:
In this not trick but this is a feature opition for any beginner user so this option show ads after any of your posts so this no useful for the cost of your Adsense clicks.

-The Third Trick
:
Ads appear in any of your posts and this trick let you add ads any where of the post content so it is the great trick for your to increase the Adsense revenue

Read full story

Thursday, April 30, 2009

Another Solutions For Seo : Adding This Directories Code

6 comments


Hi There :-)


- In the beginning many of us seeking to improve the level of SEO To achieve many objectives such as Increase Your PageRank and Get More Traffic,Also to maintain the level of turnout on your site for that this tool will help you greatly in achieving this.

-This Tool Including Most Niche PageRank Directories look like (Google and Yahoo,Stumbleupon,Technorati,....etc)
,In addition to most famous social bookmarking sites look like( Digg and Del.icio, Ma.gnolia,...etc) .

- Now Learn How To Add Dirctories Buttons In Your Wesite,blog or any types of your site
???

look like this :


- Copy and paste below code into the Html available area :


-For more additions just leave your email or your website url in commenting box and Will tell you new.
Read full story

Monday, April 13, 2009

"Bookmark This" Button

0 comments
How Can Add Your"Bookmark This" Button ???

Look Like This

Bookmark and Share

- For Websites -

Websites Page code:

- Copy and paste the code snippet below into your pages, between the and the tags. If your website uses templates, you can also copy the code into your template, so the button will appear on all your pages automatically.

- Your Own Code


- For Blogger -
Blogger page Code:

- This code can be used as-is. Check out the Customization Guide for more advanced options.
To include the button beneath each post,

1. Select Layout > Edit HTML
2. Check the Expand Widget Templates checkbox
3. Copy and paste the code snippet below into the template, right after this tag :
4. Click Save Template .

- If you can't find the tag, copy the template code into a text editor (e.g. Notepad), and search for post-footer, which may be in single or double quotes. We suggest you save a copy of the original template before changing it
- Your Own Code:


Read full story
 
http://www.wikio.com Blog Search Web Design Directory of Web Development Blogs Top Marketing SEO  blogs Hit It! blog search directory podcast directory Free Trial of Our Professional Search Engine Submission Service Blog Directory

Hello


BProfile

My photo
Be Hungry For Success.

Followers

^^^Back to Top Page^^^