
• All of us believe in Google Adsense ads is knowing where to place the ads. In this guide, we shall discuss the modification you can make to your Blog template to have your Google AdSense ads appear between your post title and post body, or between your post body and post footer. Also, we shall have the AdSense ads appear on every individual post.

• Many people believe that having AdSense ads just before or after the Blog posts will best optimize their performance. For the purposes of this article and to give you an idea how it would look, we have inserted the AdSense code into our template to have the ads appear immediately below the article and before the post footer. If you think you would like to do the same for your Blog, the following are the steps you should take.
• Choosing a best placement for your AdSense ads will attract more attention and will certainly impact on the revenue of Ads so i got this 3 ways to improve your ads locations.
• I will explain the 3 tricks and after finish i will show you the differences between them.
●The 1rst Trick (adding the ads in the posting box):
• Follow this steps given below:
-----------------------------------------
1- Log in into blogger with you ID
2- Go to "Settings" >>>"Formatting"
3- Change "Convert line breaks" from (Yes) to (No) and saving your settings.
-----------------------------------------
• Now you need to go to posting your topic that will include adsense code how can add the code just copy and paste this code any where you want in the post content :
Code:
• After finish your posting included ads code sure your ad will appear in the place you have chosen.
#Tip-"You can add this code every where you want in the blogger post just for example you can add ads in the beginning of post content or put ads in the middle or put it in the end of post you just chose the best places of your content to achieve more click on the ads".

● The 2ond Trick (ordinary way by blogger feature):
- Use This Google Feature:
• Go to Template -> Page Elements and you see in your layout the heading “Blog Posts”. Click the “Edit” link at the bottom right corner. You will see this screen.
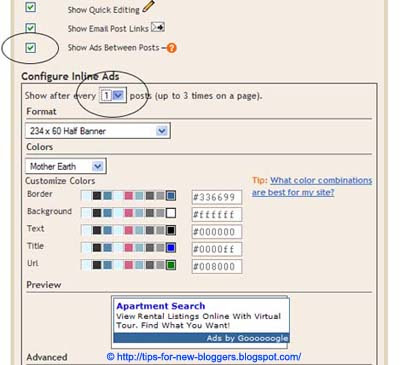
• Click on check for the “Show Ads Between Posts” You can change placements to show ads after every post or after several posts. In accordance with AdSense Terms, a maximum of 3 Ads will be shown, Customize the ad format and size, color scheme. Save the changes and refresh your Blog to see the Ads.
● The 3rd Trick (ads code editions):
- Some Changes For Ad Code and locations:
• All we have to do now is to add some changes for your adsense code,all we have to change is converting some of the characters in beginning and ending of the code look like change this signs (>,<,") with other characters follow how you can do this :
Change the html signs to creat your Edition code in this New Signs in this Txt :
for example look in this screen:

Your Edition code must copied in this code i will named it Y:
• After editing your adsense code open your dashboard, Go to Template -> Edit HTML -> Click the "Download Template" link to backup the template to keep your template additions then click check for “Expand Widget Templates”.
Now search for post.body(data:post.body) through your browser's search function (Ctrl+F for Firefox or IE).
Find this code:
If you want the ads appear above post content, just add your Edition code above the previous code ,Also if you like to add Adsense ads below the content of post just do the opposite.
#Tip-"Choose the smallest AdSense formats look like 125x125 or 468x15 to keep the regularity of your post content, You can change your ads Float from left to right or center".
- Set Ads Margins & Padding(Styling Code Y ) :
• If the AdSense ads appear too close to the edge, To give you an idea how wide the margin should be you can set margin to 30px so the new Y code will be after adding margin-left:30px :
Or you want to align the AdSense ad to your text, you can set a margin or padding around the entire AdSense code the new Y code will be after adding
margin-left:5px 10px 15px 20px :
5px: is for the top margin
10px : is for the right margin
15px : is for the bottom margin
20px : is for the left margin
Preview the template and if you are satisfied, save the template and refresh your Blog to see the new placements of your AdSense ads.
• The Differences between this tricks
-The First Trick :
Ads appear in one post and not appear in other messages because we add the code in the posting box html not in the html of your template.
-The Second Trick :
In this not trick but this is a feature opition for any beginner user so this option show ads after any of your posts so this no useful for the cost of your Adsense clicks.
-The Third Trick :
Ads appear in any of your posts and this trick let you add ads any where of the post content so it is the great trick for your to increase the Adsense revenue


5 comments:
thanks for you willi
thanks you Friend
http://01maroc.com
your welcome
Sorry, but I don't find this post to be very helpful. Here's a few things wrong with it:
1. <div style="'float:left;'"> isn't correct. It should be <div style="float:left;">
2. margin-left:5px 10px 15px 20px isn't correct. Try margin: 5px 10px 15px 20px;
3. Overall, your post isn't very clear. It's hard to understand even for someone that is experienced with stuff like this.
4. You spammed your post on DigitalPoint. ;p
ok thanks for your notice
Post a Comment